What Actually Happens on Aircon Installation Day in Singapore
We constantly hear the same concern from homeowners across Singapore. Upgrading your climate control system often feels highly disruptive to your daily routine.
A clear schedule puts you firmly in control of the situation.
Our technicians find that understanding the aircon installation process removes a lot of the anxiety. We will break down the specific new aircon installation steps so you know exactly what to expect.
The entire aircon install day becomes much easier to manage with a proper plan.
Pre-install survey (1 day before)
We conduct a comprehensive site survey one day before the actual installation to measure the rooms and plan the piping routes. A standard HDB bedroom usually requires a 9,000 BTU unit, while larger living spaces need significantly more power.
Our technicians assess several critical factors during this visit to ensure a smooth aircon setup time. Proper planning prevents unexpected delays later in the week.
- Room measurements: Calculating the exact BTU sizing required for each specific room.
- Bracket location: Finding the best outdoor unit positioning and checking ledge access.
- Refrigerant routing: Mapping the copper line path between the indoor and outdoor units.
- Drainage routing: Establishing a steady slope toward the drain pipe to guide the condensation path.
- Electrical isolation: Checking for a dedicated breaker or isolator switch availability.
We highly recommend discussing material upgrades during this site survey. Thicker insulation prevents annoying condensation problems in Singapore’s humid climate.
Our team provides a written quote covering the unit, brackets, copper piping, labour, and commissioning. You will clearly see the costs for a standard length of piping and the price for any additional metres.
| Component | Standard Grade | Upgraded Recommendation | Reason for Upgrade |
|---|---|---|---|
| Copper Pipe | G23 (0.61mm thick) | G22 (0.71mm thick) | Reduces the risk of future gas leaks. |
| Insulation | 3/8 inch Armaflex | 1/2 inch Armaflex Class 0 | Superior absorption prevents water dripping. |
Installation day timeline (typical System 3)
We structure the installation day to follow a strict, predictable schedule. A typical System 3 setup takes approximately six hours from arrival to the final handover.
Our schedule ensures minimal disruption to your home environment. The timeline below outlines exactly how the day unfolds.
8:00 am, Arrival and setup (30 min)
Technicians arrive early with the unit, brackets, copper piping, refrigerant, and tools. Heavy drilling is strictly forbidden by HDB before 9:00 am, so this initial period focuses entirely on preparation. We lay down heavy-duty floor protection to keep your tiles safe. The electrics are then carefully isolated at the main breaker.
8:30 am, Bracket installation (60 min)
We drill BCA-compliant stainless steel brackets directly into the outdoor wall or ledge. The technician will show you the exact bracket placement for your confirmation before any holes are made. Our teams strictly use 304 stainless steel for these supports. This material offers excellent corrosion resistance for typical residential areas without the premium cost of marine-grade 316 steel. Once those holes are in, they are permanent.
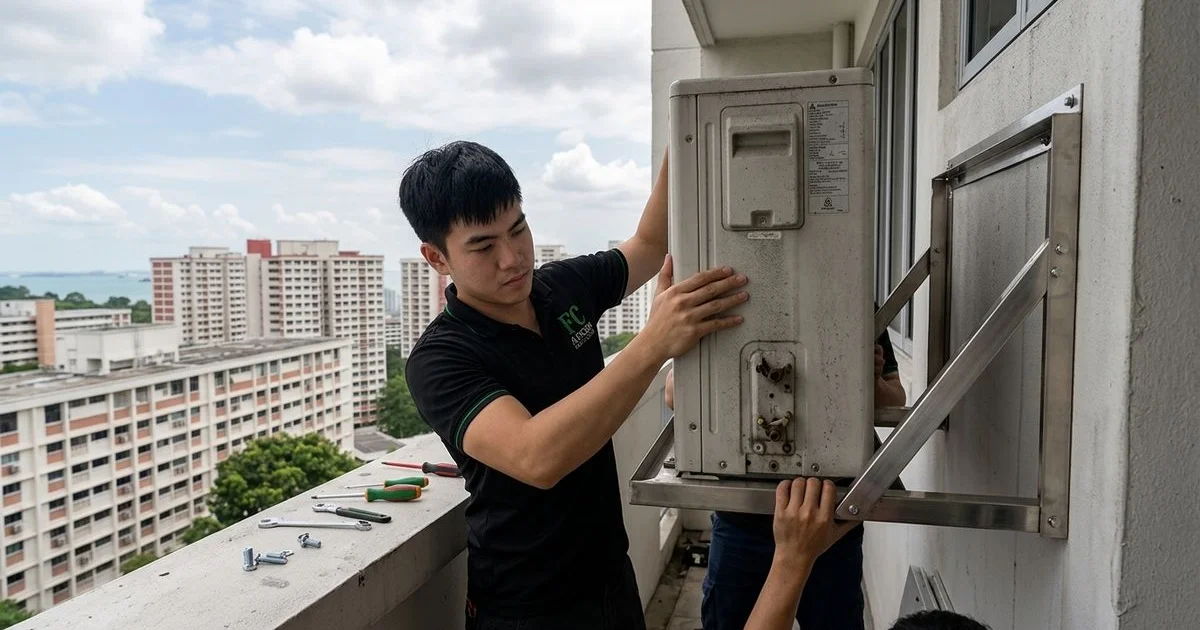
9:30 am, Outdoor unit mounting (45 min)
The outdoor condenser is then lifted onto the bracket and firmly secured. Condensers for a System 3 typically weigh between 35 and 45 kilograms. We strictly enforce the use of safety harnesses or gondola access for all high-floor work.
10:15 am, Indoor unit mounting (30 min per unit, so ~90 min for 3 units)
We mount the indoor units on the wall at the agreed position. Each unit must sit perfectly level while maintaining the proper 1:100 drainage slope. Our technicians ensure this specific angle to prevent stagnant water and subsequent leaks. Every indoor installation requires a sturdy wall plate, a cleanly drilled hole through the masonry for the lines, and careful mounting onto the plate.
11:45 am, Refrigerant piping (60 to 90 min)
Installers run copper refrigerant lines from each indoor unit back to the outdoor condenser. High-quality pipe insulation is applied along the full length of the run. We typically use half-inch Armaflex Class 1 or Class 0 insulation for Singapore installations to prevent surface sweating. The drainage piping is then routed carefully to maintain that essential downhill slope.
1:15 pm, Vacuum and pressure test (30 min)
We vacuum the closed refrigerant loop using a specialised pump to remove all air and moisture. The goal is to reach a deep vacuum level of 500 microns. A high-pressure test then verifies that the system holds strong. Holding the system at 500 PSI for over 30 minutes without any pressure drop confirms there are absolutely no leaks.
1:45 pm, Refrigerant charge (15 min)
Our specialists weigh the refrigerant to the exact manufacturer specification using a digital scale. The industry standard has shifted heavily to R32 refrigerant for new residential units. This modern gas complies with 2026 National Environment Agency regulations due to its lower Global Warming Potential of 675.
2:00 pm, Test cycle (15 min)
We power up the system and run it on cooling mode for a full 15 minutes. The technicians check for a 10 to 12-degree Celsius temperature drop between the return and supply air. Our team also verifies that cold air flows freely at each indoor unit. A final inspection ensures that drainage flows smoothly, the outdoor condenser runs quietly, and every joint remains completely dry.
2:15 pm, Walkthrough and handover (15 min)
We explain the remote controls, recommended temperature settings, and basic maintenance steps. Cleaning the primary filters every two weeks keeps the unit running efficiently. Our team hands over the warranty paperwork, which typically includes 12 months for workmanship and the manufacturer parts warranty. The crew removes all floor protection and vacuums the work area on the way out.
What can extend the timeline
We plan carefully, but certain site conditions can naturally extend the duration of the installation. Long pipe runs and difficult outdoor access are the most common causes of delays.
Our teams always communicate any expected timeline shifts as early as possible. Several specific factors require extra labour and time.
- Long pipe runs: Adding copper piping beyond the standard length requires an extra 30 to 60 minutes per additional metre.
- Difficult outdoor access: A high-floor condo without good ledge access can easily add a half-day to the schedule.
- Condominium management rules: Strict permit approvals or limited working hours often stretch a one-day job into two.
- Custom routing: Hiding pipe runs through false ceilings or internal walls takes significantly longer than standard trunking.
- VRV/VRF or ducted systems: These complex configurations take one to three days, including full commissioning.
For larger or commercial installations, see commercial aircon or aircon installation. For sizing your system before installation day, see System 1/2/3/4/5 guide.
We know that scheduling a major home upgrade requires careful thought. A professional assessment ensures you get the right equipment with minimal fuss.
Reach out today to schedule your site survey and secure your ideal installation date.